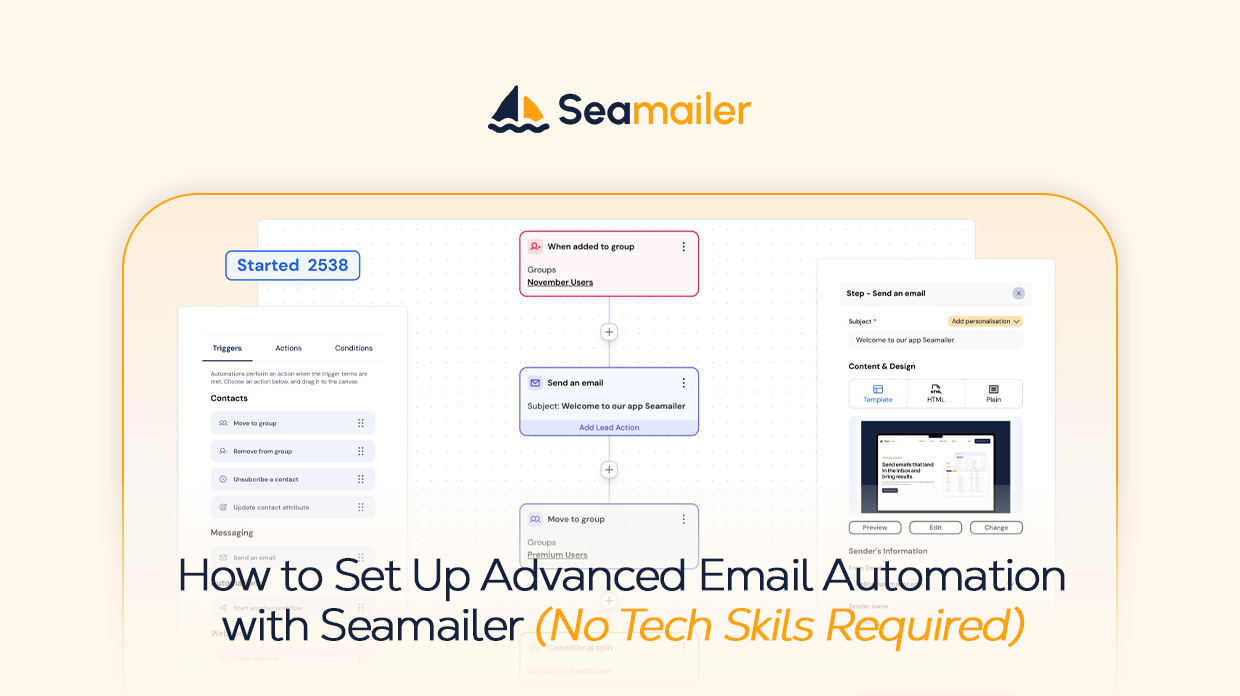
How to Set Up Advanced Email Automation with Seamailer (No Tech Skills Required!)
Master Advanced Email Automation with Seamailer: A Step-by-Step Guide for Beginners
Think advanced email automation is only for tech-savvy pros? Think again. This in-depth, beginner-friendly guide shows you how to set up powerful, data-driven workflows in Seamailer to save time, increase engagement, and grow your business—no coding required.
The Power of "Set It and Forget It": Why Smart Automation is Your Secret Weapon
Let’s be honest: your to-do list is already a mile long. You're juggling content creation, customer support, social media, and a hundred other things that need your immediate attention. Amidst this chaos, the idea of adding "complex email automation" to your plate can feel like a one-way ticket to burnout. You imagine intricate flowcharts, lines of code, and a steep learning curve that you simply don’t have time for.
But what if advanced email automation wasn’t about being a technical genius? What if it was about being a smart strategist? The truth is, the most powerful email campaigns are the ones that work for you, 24/7, without constant manual effort. They are the welcome sequences that nurture new subscribers, the abandoned cart emails that recover lost sales, and the re-engagement campaigns that bring dormant customers back into the fold.
This isn’t a pipe dream. With a platform like Seamailer, these sophisticated automations are not only possible but surprisingly easy to set up. You don't need to write a single line of code or have a degree in computer science. You just need a clear plan and the right tools.
This guide will walk you through the entire process, from mapping out your first workflow to launching an advanced, data-driven campaign that boosts your bottom line. Let's unlock the power of automation and finally get some time back in your day.
Phase 1: The Blueprint – Planning Your Automation Strategy
Before you touch a single button, you need to think like a chess player. You need to map out the journey you want your subscribers to take. The secret to a successful automation is a well-thought-out plan.
1. Define Your Goals: What do you want to achieve with this automation? Are you trying to:
- Welcome new subscribers and introduce your brand?
- Nurture leads and guide them toward a purchase?
- Win back inactive customers?
- Send a personalized thank-you after a purchase?
Your goal will dictate the entire structure of your automation. A welcome series has a different flow and a different tone than an abandoned cart sequence.
2. Map Your Customer Journey: Grab a pen and paper or open a simple flowchart tool. Visualize the customer's path. It might look something like this:
- Trigger: The action that starts the automation (e.g., signing up for a newsletter).
- Action 1: The first email is sent (e.g., a welcome email).
- Wait: A specific delay (e.g., two days).
- Condition: A decision point (e.g., Did the subscriber open the first email?).
- Path A (Yes): If they opened it, send them the next email in the sequence.
- Path B (No): If they didn't, send a different, more enticing email with a new subject line.
- Action 2: Send the second email.
- End: The sequence concludes.
This simple mapping exercise turns a complex idea into a manageable, visual plan.
3. Write Your Content: Once you have your blueprint, write the content for each email in the sequence. This is a crucial step. Write in a human, conversational tone. Use clear, compelling subject lines. And make sure each email has a single, clear call to action (CTA).
Phase 2: Building Your Automation in Seamailer
Now for the fun part. Seamailer’s visual workflow builder makes this process incredibly intuitive. You’ll be able to see your plan come to life, step by step.
1. Set the Trigger: This is the starting point of your automation. In Seamailer, a trigger can be almost anything:
- A New Subscriber: The most common trigger. When someone signs up for your list, the automation begins.
- A Specific Tag: When you apply a certain tag to a contact (e.g., "Webinar Attendee"), a specialized automation for that group starts.
- A Link Click: If a subscriber clicks a specific link in an email, it can trigger a new sequence based on their interest.
- A Purchase: An e-commerce integration can trigger a post-purchase follow-up series.
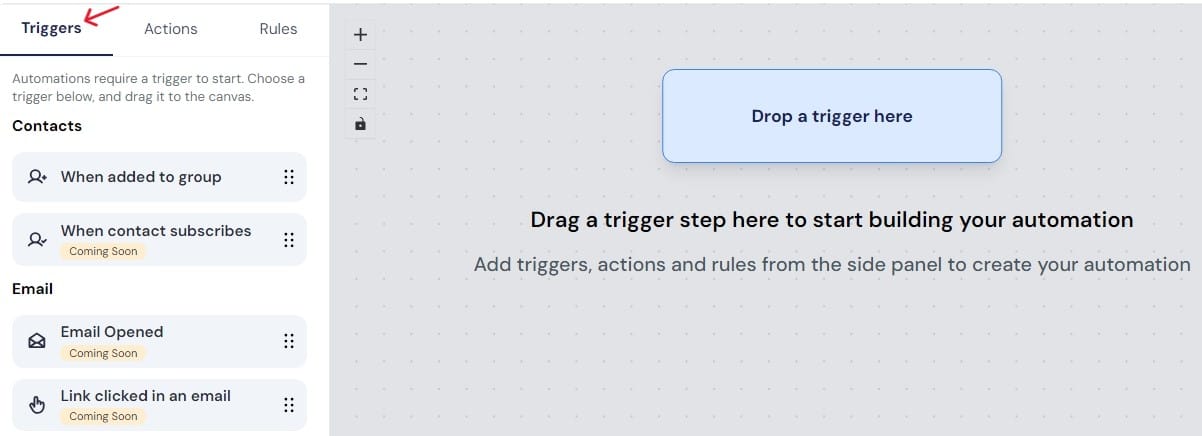
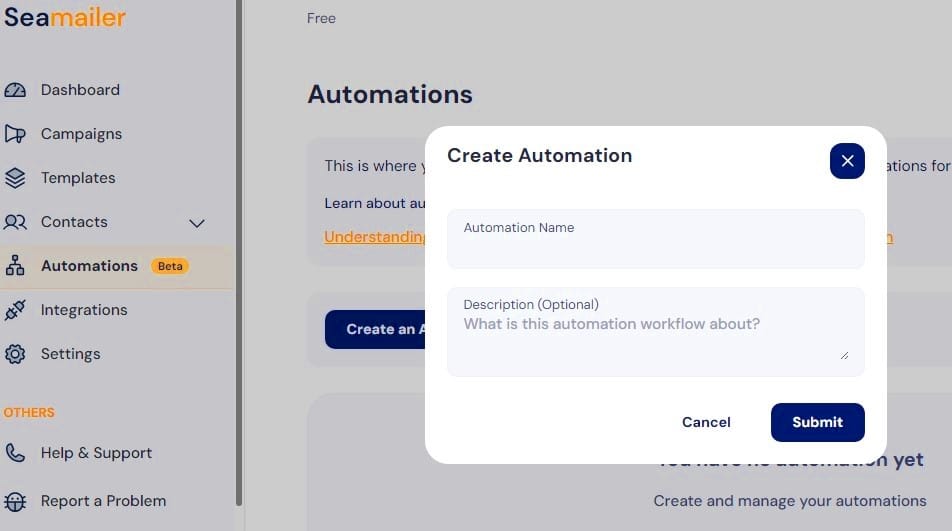
Navigate to the "Automations" section in your Seamailer dashboard and select "Create Automation." You’ll be presented with a clean interface where you can choose your trigger.
2. Add Actions and Delays: With the trigger set, you'll see a visual canvas where you can build your workflow using a simple drag-and-drop system.
- Action: Click the plus sign and select "Send Email." You can then choose one of the templates you've already created.
- Delay: Add a "Wait" step to control the timing. This is important to avoid overwhelming your subscribers with too many emails at once. A typical welcome series might have a delay of 2-3 days between emails.
3. Implement Conditions for Smart Segmentation: This is where your automation goes from basic to advanced. A "Condition" step (often an "if/then" branch) allows you to personalize the customer journey based on their behavior.
- Example: After sending your first email, add a condition that asks, "Did the subscriber open the email?"
- Yes Path: If they opened it, they're engaged. You can send them a more detailed, value-packed email.
- No Path: If they didn't, they might be busy. Send a different email with a new, punchy subject line to try and capture their attention.
This dynamic approach ensures every subscriber gets the most relevant content, boosting engagement and conversions.
4. Add Tags for Future Targeting: A simple but powerful feature is the ability to add or remove tags within an automation.
- Example: If a subscriber clicks on a link about a specific product category, you can add a tag like "Interested in [Product Category]." Later, you can send targeted broadcast emails specifically to this group.
Phase 3: Advanced Automation Examples (No Tech Skills Required!)
Let’s look at a few practical, advanced automation workflows you can build with Seamailer without any coding.
Workflow 1: The High-Converting Welcome Series
This is more than just a single email. It's a multi-touchpoint sequence designed to build a relationship and drive an initial conversion.
- Trigger: Subscriber signs up for your newsletter.
- Step 1 (Immediate): Send a "Welcome to the Family!" email. Thank them for joining and deliver on your promise (e.g., a free PDF, a discount code).
- Step 2 (2-day delay): Send a "Value" email. Share your most popular blog post, a customer success story, or a short video. The goal is to build trust and show them you're an authority in your niche.
- Step 3 (3-day delay): Send a "Problem/Solution" email. Highlight a common problem your audience faces and explain how your product or service is the perfect solution.
- Step 4 (2-day delay, if not converted): Send a "Social Proof" email. Share a few glowing customer testimonials or a case study to build credibility.
- End: The automation concludes. The subscriber is now a nurtured lead, ready for future campaigns.
Workflow 2: The Passive Income Generator
This is for e-commerce businesses and creators selling digital products.
- Trigger: A contact purchases "Product A."
- Step 1 (Immediate): Send a "Thank You" email with the purchase details and download links. This is a critical trust-building step.
- Step 2 (5-day delay): Add a "Condition" branch. Has the customer opened the previous email?
- Yes: Send an email that asks for a review and offers a small discount on "Product B" (an upsell or cross-sell).
- No: Send a simple email with a new subject line, reminding them to check their purchase.
- Step 3 (10-day delay): Check for another condition: Has the customer purchased "Product B"?
- No: Send a "Last Chance" email for the discount.
- End.
This automation ensures your customers feel valued after a purchase and systematically guides them toward another sale, all on autopilot.
Phase 4: Launching & Optimizing Your Automation
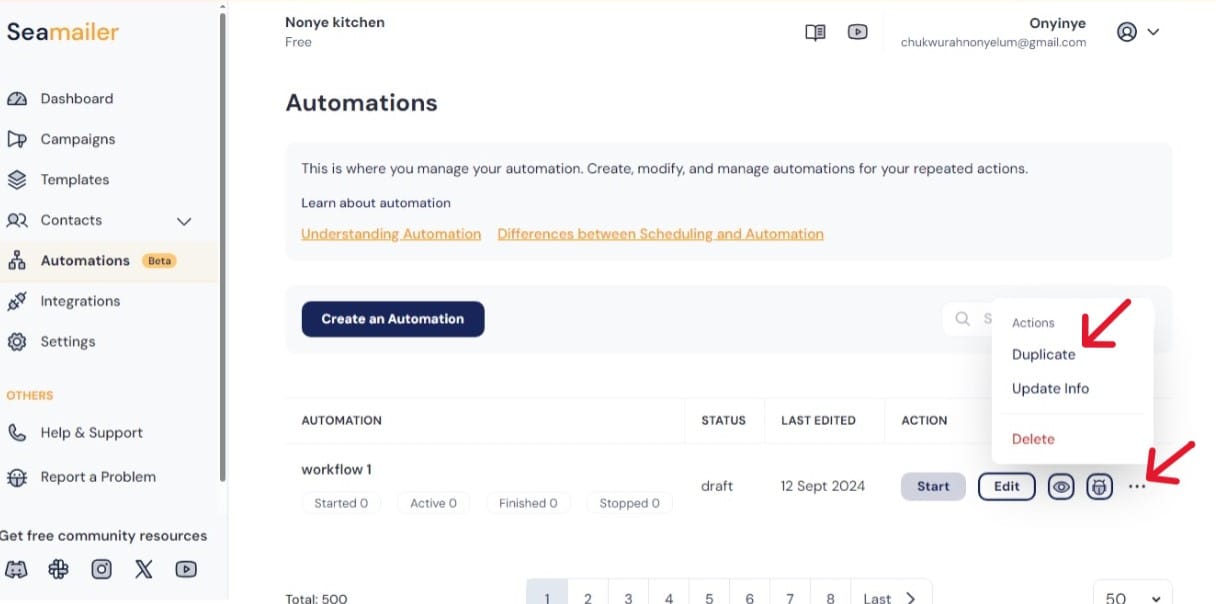
Once you've built your workflow, take a moment to review it. Use Seamailer’s test mode to send a "dry run" of the sequence to yourself. Check for typos, broken links, and that the timing feels right.
When you're confident, simply flip the switch to "active." The automation will now run continuously, working for you in the background.
But the work isn't over. The final step is to monitor your results. Use Seamailer’s analytics to track:
- Open and click rates for each email.
- Which links get the most clicks.
- Which path in your "if/then" branches performs better.
Use this data to refine your content, adjust your delays, and create even more effective automations in the future.
Advanced email automation doesn’t require a background in technology. It requires a clear understanding of your audience and a willingness to use the powerful, user-friendly tools available to you. With a platform like Seamailer, you can create sophisticated, highly personalized campaigns that save you time and grow your business, leaving you free to focus on what you do best.